Interviews are one of the most common kinds of video: business videos, documentaries, testimonials and online channels all use them. A well-lit interview makes a person look natural, confident and separated from the background; a badly lit one makes them look tired, flat or lost in the scene. This lesson shows how to use three-point lighting for interviews, where to place each light, how to add depth with the background, and how to get great results with only one light or a window.
What makes interview lighting different?
Three-point lighting uses a key light, a fill light and a back light, as explained in single-light, two-light and multi-light setups. Portrait lighting patterns were explained in lighting portraits and people. Interview lighting applies these ideas to a person who sits in one place for a long time, talks and moves a little, and is filmed from one or two camera angles. The light must stay flattering for every moment, not just one photograph.
The classic interview setup
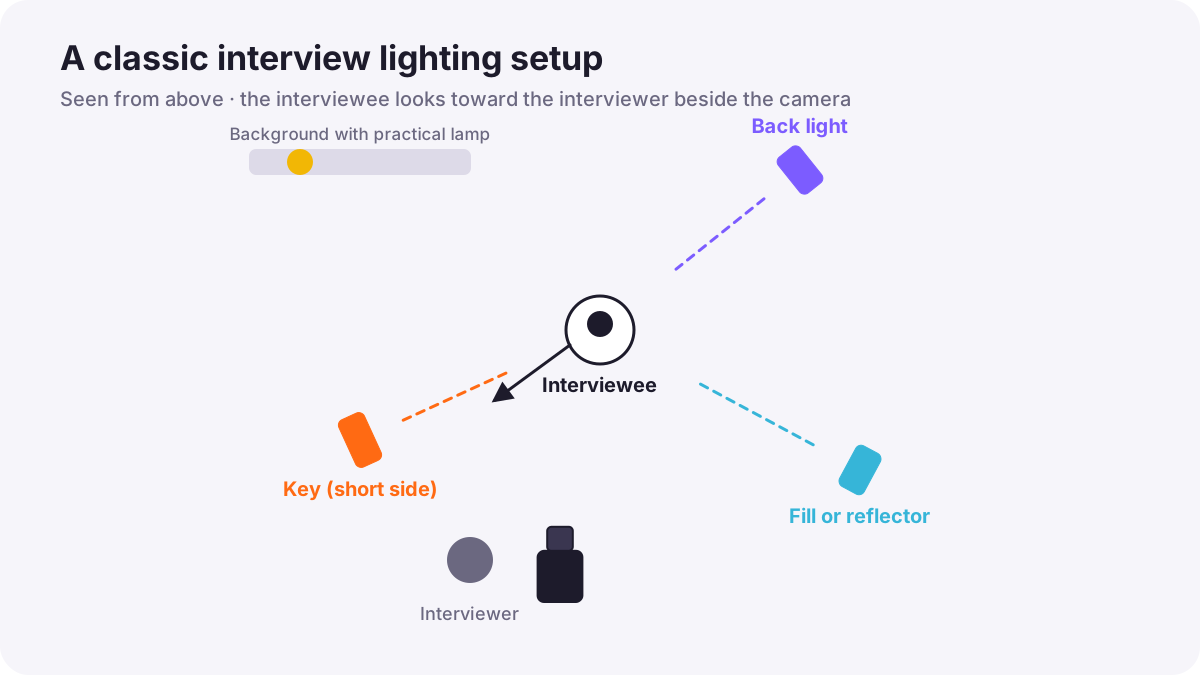
| Light | Where it goes | What it does |
|---|---|---|
| Key light | About 30 to 45 degrees to one side, slightly above eye level, large and soft | Main light that shapes the face |
| Fill light | On the other side, weaker, or a reflector | Softens shadows; controls mood |
| Back light (rim or hair light) | Behind the person, opposite the key, aimed at the head and shoulders | Separates the person from the background |
| Background light (optional fourth light) | Aimed at the wall or set behind | Adds depth, color and interest |
Lighting ratios between key and fill were explained in lighting ratios, contrast and consistency. Stronger contrast feels dramatic and serious; lower contrast feels friendly and open.
Short-side key light
In most interviews the person looks slightly to one side of the camera, toward the interviewer. Placing the key light on the side the person is looking toward, so the side of the face farther from the camera is lit, is called short-side lighting. It adds shape and depth. Lighting the side nearer the camera (broad lighting) looks flatter. These patterns were introduced in lighting portraits and people.
Tip:Sit the interviewer next to the camera on the same side as the key light. The person then looks toward the light, and their eyes catch it naturally.
Eyes, skin and glasses
- Eye light: a soft key light creates a small catchlight in the eyes, which makes a person look alive.
- Soft, large sources: a big softbox or diffusion close to the person flatters skin.
- Shine: if foreheads look shiny, soften the light or add more diffusion.
- Glasses: move the key light higher or more to the side until reflections disappear from the lenses.
Background and depth
- Distance: place the person a few meters in front of the background so it can be lit separately and falls slightly out of focus.
- Practical lights: lamps or small LEDs in the background add warmth and atmosphere, as in creative lighting techniques.
- Darker backgrounds: make the person stand out; background light separation was explained in background lighting and subject separation.
- Color contrast: a warm face against a slightly cooler background creates pleasing depth.
One-light and window setups
- One light: place a large soft key at 45 degrees, use a white reflector on the other side for fill, and let a practical lamp light the background.
- Window light: turn the person so the window lights them from the side and slightly in front, never from directly behind unless you want a silhouette; add a reflector for fill. Window light was explained in window light and indoor natural light.
- Long interviews by a window: daylight changes over time, so check exposure and white balance often, or add an LED to keep it steady.
Two-camera interviews
Many interviews use a main camera and a second camera at a different angle and size, for example a medium close-up and a closer shot from the side. Light the person so both angles look good, keep both cameras on the same side of the line, as in continuity and the axis of action, and match their white balance and exposure.
Common mistakes
- Key light straight in front: the face looks flat.
- Fill as strong as the key: the light loses all shape.
- Person against the wall: no depth and heavy shadows on the background.
- Mixed color temperatures: faces look orange on one side and blue on the other.
- Window directly behind the person: the face is too dark.
How professionals light interviews
Documentary and corporate crews usually choose the background first, then place the person well away from it, use a large soft short-side key, control fill with reflectors or black flags, and add a subtle back light and practical background lights. They light with a stand-in, check skin on a monitor with the waveform, and keep the setup the same for every interview in a series so they match.
Practical examples
A company testimonial
- Situation
- A manager will speak for a company video in a plain office.
- What to do
- You seat her two meters from a shelf, use a soft short-side key, a reflector fill, a small back light and a warm lamp on the shelf.
- Why it works
- Short-side light shapes the face, the back light separates her, and the lamp adds depth.
- Result
- A warm, professional interview that does not look like a plain office.
Glasses reflecting the light
- Situation
- The key light reflects in a speaker's glasses.
- What to do
- You raise the key light and move it further to the side.
- Why it works
- Changing the angle moves the reflection out of the lenses.
- Result
- Clear eyes with no glare.
Key points
- Interviews use three-point lighting: a soft key, a weaker fill and a back light, often with a background light.
- Place the key on the side the person faces (short-side lighting) for shape and depth.
- Large soft sources, eye lights and careful angles flatter skin and avoid glare on glasses.
- Move the person away from the background and light it separately with practical lights.
- One soft light plus a reflector, or a side window, can look very professional.
Frequently asked questions
What is the best lighting for an interview?
Can I light an interview with one light?
Where should the interviewer sit?
How do I stop reflections in glasses?
Conclusion
Great interview lighting uses a soft short-side key, controlled fill, a back light and a lit background with depth. Even one light and a reflector can look professional. You have now completed the lighting course for both photography and video.
Finished reading? Track your progress through Flash and studio lighting.